Quick Start
Last update:2023-12-18 10:55:55
This article outlines the necessary steps to quickly start using CDNetworks Enterprise Access (ESA) services.
A minimum deployment process includes 6 steps:
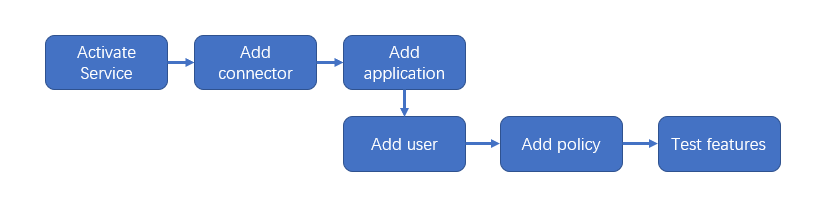
1. Activate Service
- Activate service: Once a contract been signed, our engineer will help to activate the service and create a Console account for you.
- First setup: After the service is activated, our sales engineer will contact you to gather necessary information to assist you in preparing for access to the ESA platform. This includes: opening a dedicated enterprise space, installing connectors, integrating applications and user accounts, configuring security gateways, and more.
- ESA management platform (Console): After the first setup, use the Console account sent to log in to ESA management platform for self-configuration.
2. Add connectors
-
To integrate your applications to ESA platform, an ESA connector need to be installed on your server. Refer to Add Connector
-
Configuration path: Application Deployment–>Connector
3. Add applications to ESA platform
- For the applications deployed on Cloud, IDC or intranet, please add via Custom Application page and select correct connector to bridge applications to ESA platform.
- For SaaS applications, we recommend you to provide SaaS application name and address to CDNetworks customer service, we will integrate with vendor to import SaaS Application’s address and keep update timely.
- Refer to: Add Application
- Configuration path: Application Deployment–>Application
4. Add users and IdP
- ESA supports to import local accounts, connect with 3rd party ID providers via standard LDAP protocol, SAML protocol, OAuth2, etc. Please import users or IdP to add users to use ESA.
- Refer to: Add User
- Configuration Path: Application Deployment–>Manage Users
5. Add permission group and authorize permission to user
- Add a permission group and associate the applications to the group
- Click Manage button on the Permission list, go to Permission Info page to authorize the access permission to user groups or users.
- Refer to: Permissions and Access Control Policy
- Configuration path: Dynamic Authorization–>Basic Permission and Access Control
6. Customer access
With the above configured, send the user accounts to users. Users can access to enterprise resources via an easy-to-use client or via browser. Here is the User Guide for end user.
-
ESA client: for better user experience, we recommend you to use ESA client for access. Clients are available on Windows, macOS, iOS, Android and Linux. You can download from our website: Download the App
Special note: since App Store does not allow vendors to upload similar applications, ESA has to use the application named “Securelink”, which we sell in mainland China. Download from app store: “Securelink” -
Browser access: to enable browser access, you need to configure secure web gateway first. Please refer to: Web Proxy. After that, send the access URL to users.