About URL Authentication
Last update:2025-03-24 10:21:49
URL authentication is a sophisticated content protection strategy that enhances security compared to traditional access control measures like IP whitelists/blacklists, Referer, Cookie, and User-Agent checks. This method embeds authentication information directly within the content URL, such as timestamps and encrypted strings. When a user requests content from a Content Delivery Network (CDN), they must present a URL containing the valid authentication details. The CDN then verifies this information to determine whether to grant or deny access, effectively preventing unauthorized use of content URLs.
How URL Authentication Works
The typical URL authentication process involves the following key components:
- Content Management Server: This server is responsible for generating authenticated URLs based on predefined rules. These rules include the specific authentication algorithm and key. Once generated, these URLs are provided to the client.
- User (Client): The user, or client application, uses the authenticated URL provided by the content management server to request the desired content from the CDN edge servers.
- CDN Edge Server: Upon receiving a request with an authenticated URL, the CDN edge server performs a validation check. This involves verifying the embedded authentication information, such as the timestamp and signature, to determine the legitimacy of the request. Based on the validation outcome, the CDN either serves the requested content or denies access.

Example Scenario
Consider a scenario where you need to protect an image file located at http://example.com/test.jpg. The URL authentication process would proceed as follows:
- Request for Authenticated URL: The user (client) initiates a request to the content management server for the URL of the protected content.
- Authenticated URL Generation: The content management server, based on its configured rules (including the authentication algorithm and key), generates a time-sensitive URL with an embedded token. For instance:
http://example.com/test.jpg?token=123. This authenticated URL is then returned to the user. - Content Request from CDN: The client uses the generated authenticated URL to request the content from the CDN edge servers.
- Authentication and Content Delivery: The CDN edge server receives the request and validates the authentication information present in the URL (in this case, the
tokenparameter). If the authentication is successful, the CDN serves thetest.jpgimage to the client. If the authentication fails (e.g., the token is invalid or expired), the CDN denies the request.
How to Set Up URL Authentication
- Log in to the CDNetworks Console and select the appropriate product.
- Go to the Configuration, locate the domain you wish to configure, and click Edit Configuration
 .
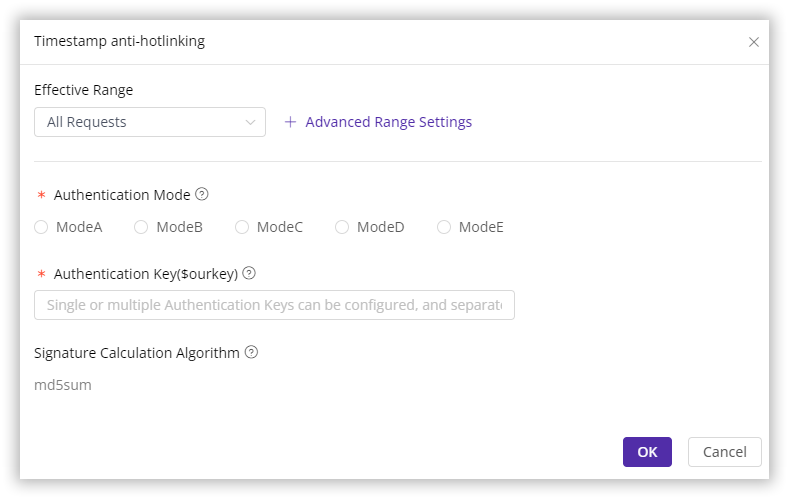
. - Navigate to Hotlinking Protection - Timestamp anti-hotlinking in the left sidebar and click Modify.
- Configure the Effective Range, Authentication Mode and other settings based on your needs.
Scope of Effectiveness
You can typically define the scope of requests to which URL authentication will be applied. Common options include:
| Setting | Description |
|---|---|
| All Requests | Apply URL authentication to all types of requests for the specified domain. |
| Only Homepage | Restrict URL authentication to requests for the root directory of the domain (e.g., http://domain/ or https://domain/). |
| Specified File Type | Applies only to specific types of files. You can select from the predefined file types on the left or define custom file types. Separate multiple custom types with a semicolon ;.(e.g., jpg;png). |
| Specified URI | Define specific URIs to which URL authentication should apply. Options might include: Exact matching: Matches the full URI, including any query parameters (e.g., path/index.html?abc=123). Ignore the parameter matching: URI without query parameters.(e.g., path/index.html). |
| Specified Directory | Apply URL authentication to all requests for content within specific directories (e.g., /file/abc/ will affect all content under http://domain/file/abc/*). Ensure that directory paths start and end with / and contain only letters, numbers, and the special characters _, %, and .. Separate multiple directories with line breaks. |
| URL Pattern | Use regular expressions to define the scope of requests. For example, .jpg$ would apply to all URLs ending with .jpg. |
Authentication Mode
You can select from five authentication modes available on the CDNetworks Console, each tailored to different needs and situations:
How to Verify your URL Authentication
Due to the complexity of URL authentication settings, it is advisable to deploy configurations to a test environment first to avoid impacting your live operations. Once verified as correct, you can apply them to the production environment. For detailed guidance on deploying the configurations to a test environment, refer to Verify Configurations Through Pre-Deployment.
Additionally, you can use the Timestamp Anti-Hotlinking Calculator  available on the CDN Console to automatically generate URL authentication parameters for test and verify whether the authentication parameters will be successfully passed by the CDN edge servers. For more on how to use this tool, visit Timestamp Anti-Hotlinking Calculator.
Is the content of this document helpful to you?
Yes
I have suggestion