Device Authorization
Last update:2023-08-17 16:49:52
1. Usage Scenario
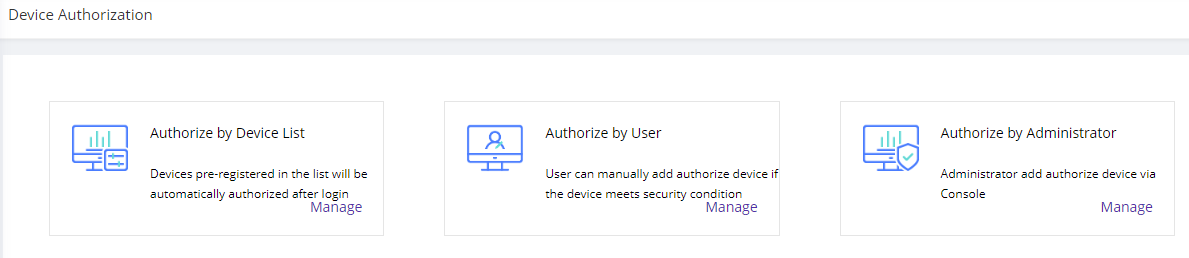
To ensure that all the devices access to your applications are secured and managed, ESA offers this page for administrators to authorize or block the devices. We offer 3 ways to authorize devices:
| Authorization Method | Explanation |
|---|---|
| Authorize by Device List | Pre-register a list of devices before user login. Once a device's MAC has been added to the list, when the user login to ESA client with the device, the device will be automatically authorized. We can add device by MAC address |
| Authorize by User | Setup the conditions to verify if the user has the permission to add authorize device by themselves. When the users meet the pre-configured conditions and login to ESA, they will be given the option to add authorize device by themselves. |
| Authorize by Administrator | It configures the device authorization common settings for the device that are manually authorized by administrators from device list. |
2. Operation Steps
1)Authorize by Device List
1.1)Go to Device Security–> Authorize by Device List–>Manage
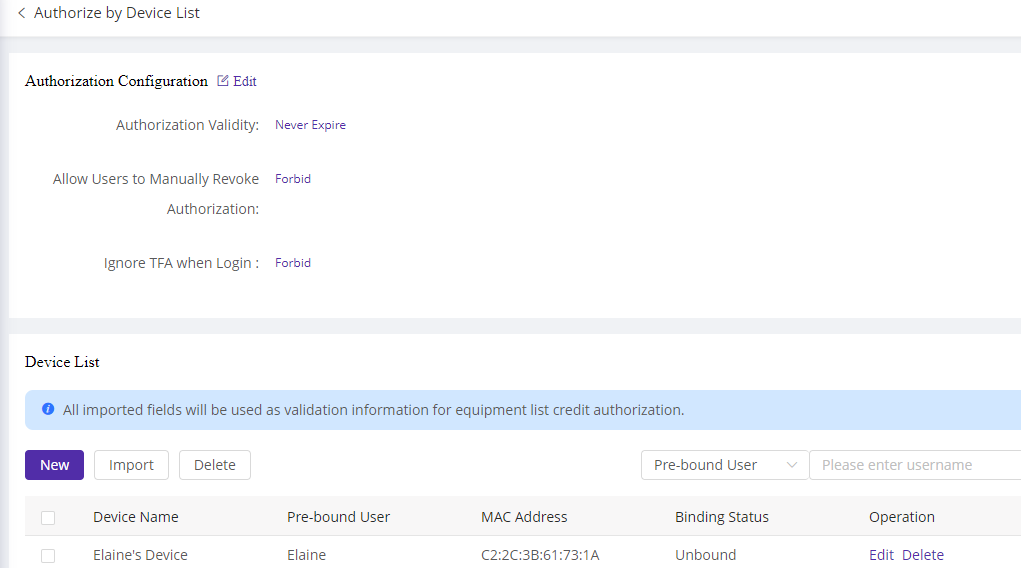
1.2)Configure the common settings for the devices authorized by list
| Field Name | Explanation |
|---|---|
| Authorization Validity | It configures the validity of authorization status. You can configure a specific expire date or just set it to Never Expire. After the expire date, the device status will be changed to unauthorized |
| Allow Users to Manually Revoke Authorization | It configures whether allow users to manually revoke authorization. This is to prevent that the user revoke from current device and fake the MAC address on another device to login. |
| Ignore TFA when Login | It configures if user can skip MFA when login from the authorize device |
1.3) Add authorize device
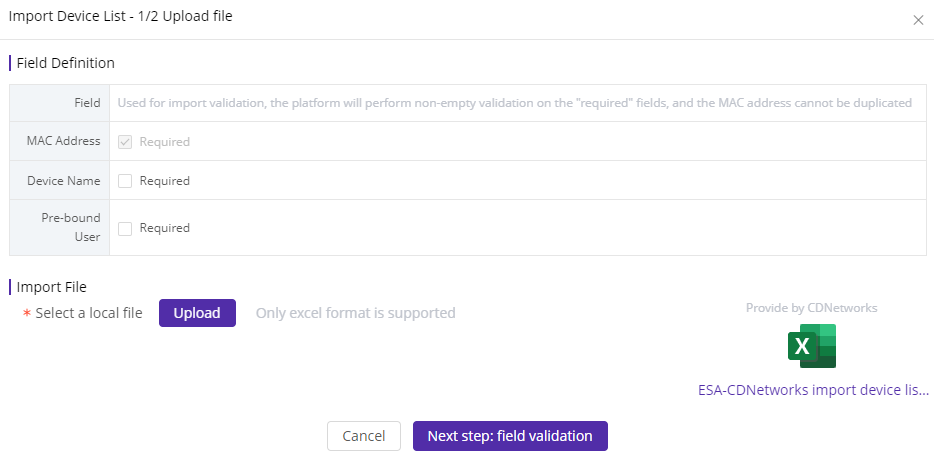
1.3.1) Click Import and download the device import template
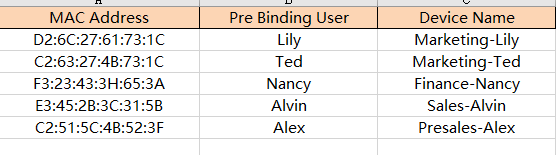
1.3.2) Fill in the device info to be authorized, save the list.
1.3.3)Upload the device list.
Field definition is used for import validation. The platform will perform non-empty validation on the “required” fields, and the MAC address cannot be duplicated.
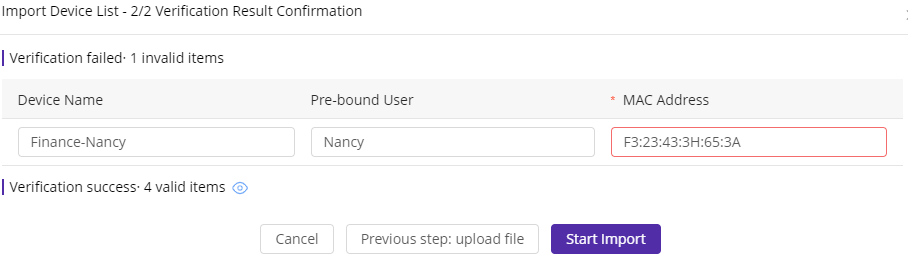
1.3.4) Field verification
If the “required” fields are empty or format is incorrect, the result will be displayed. Administrator should check and correct the information, then click Start Import.
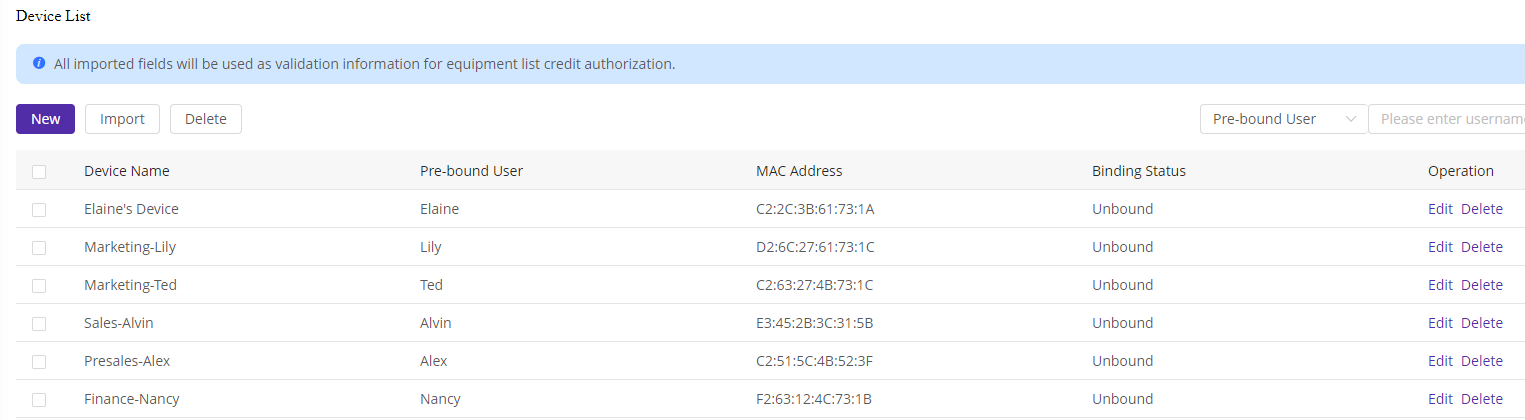
1.3.5) Authorized device list has been added.
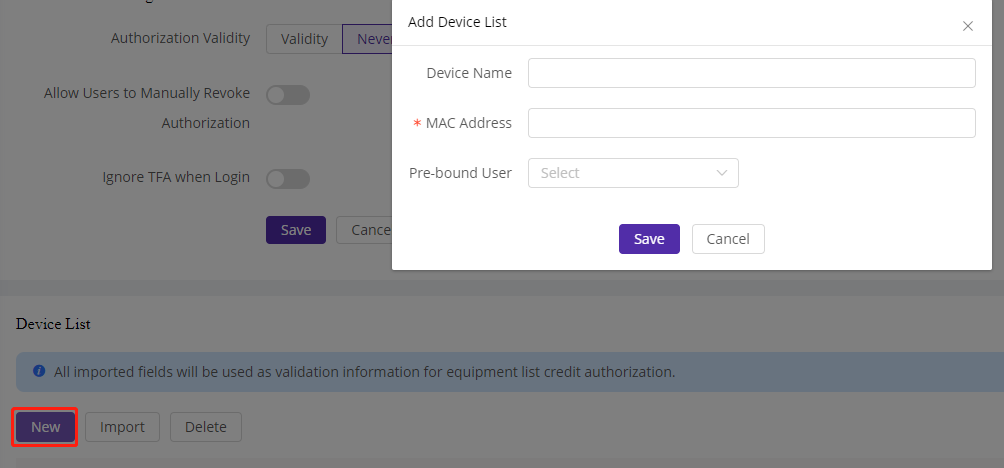
Administrators can also manually add the device one by one by pressing New button.
2) Authorize by User
2.1) Go to Device Authorization–> Authorize by User–>Manage
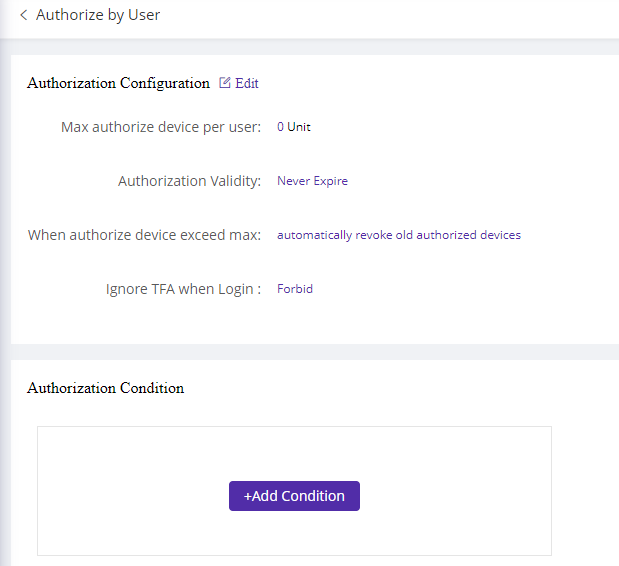
2.2) Config common settings for the user
| Field Name | Explanation |
|---|---|
| Max authorize device per user | It configures how many devices can a user add to authorize |
| Authorization Validity | It configures the validity of authorization status. You can configure a specific expire date or just set it to Never Expire. After the expire date, the device status will be changed to unauthorized |
| When authorize device exceed max | It configures how the system should react if user has already added the max number of authorize device. Automatically revoke old authorized devices: revoke the oldest device authorized by the user and add new. Cannot add new device: a notification will be displayed to inform user that authorize device by user has reach the max, cannot add new. |
| Ignore TFA when Login | It configures if user can skip MFA when login from the authorize device |
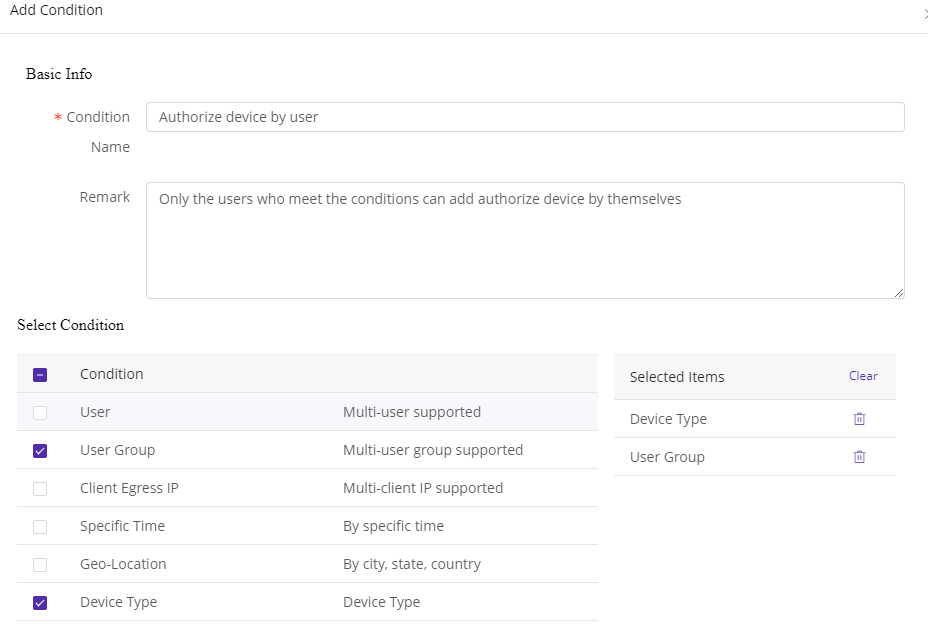
2.3) Add conditions
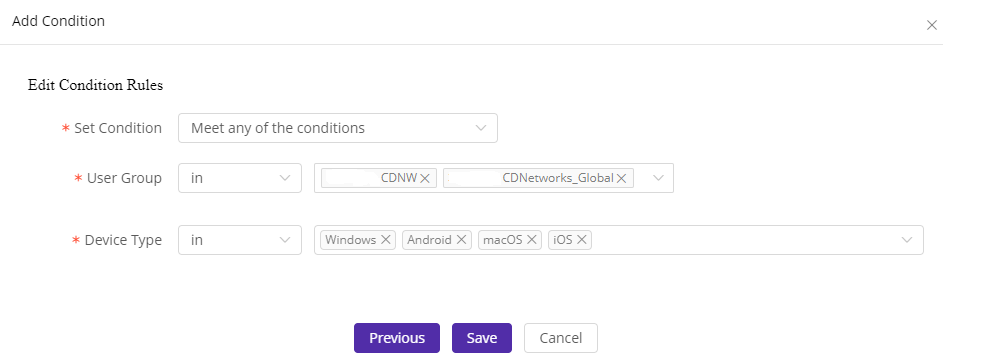
Only the users who meet the conditions can add authorize device by themselves. In the following example, users from user group CDNW & CDNetworks-Global or users who are using OS including: Windows, Android, macOS and iOS can add authorize device.
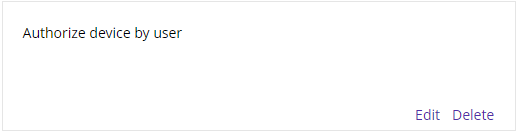
2.4) Authorize conditions added successfully
3) Authorize by Administrator
3.1) Go to Device Authorization–> Authorize by Administrator–>Manage
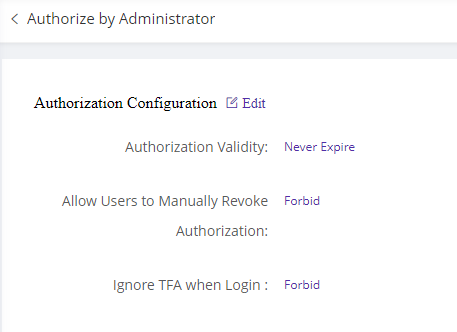
3.2)Configure the common settings for the devices authorized by administrator from device list.
| Field Name | Explanation |
|---|---|
| Authorization Validity | It configures the validity of authorization status. You can configure a specific expire date or just set it to Never Expire. After the expire date, the device status will be changed to unauthorized |
| Allow Users to Manually Revoke Authorization | It configures whether allow users to manually revoke authorization. This is to prevent that the user revoke from current device and fake the MAC address on another device to login. |
| Ignore TFA when Login | It configures if user can skip MFA when login from the authorize device |
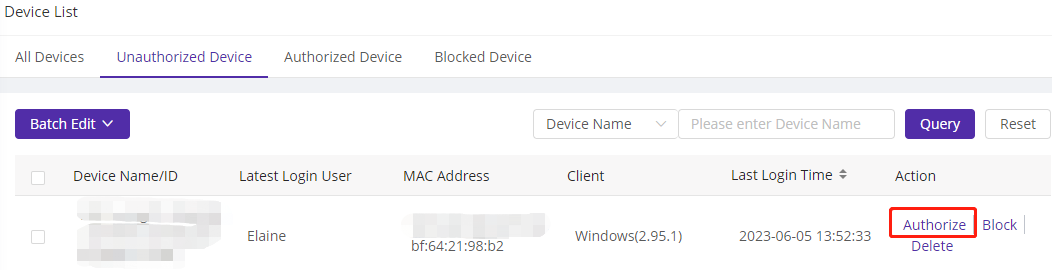
3.3)Add authorize device from list
Go to Device List–>Unauthorize Device–> select the device to be authorized and click Authorize. The selected device will be added to authorized list and applied with the above configurations.
4) Block Device
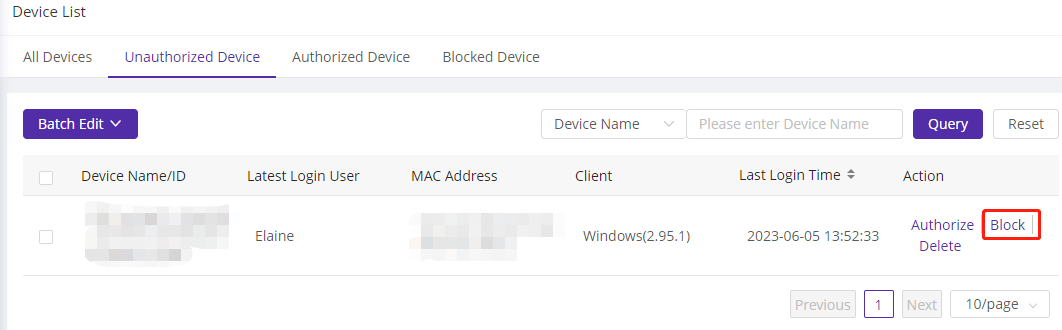
When administrators find any risky or unknown device, they can move the device to Blocklist to ensure security.
Go to Device list–>Unauthorized Device–> select the target devices and click Block to add the device to block list.
After confirmation, administrator find the device is from secure user and would like to revoke device from block list, then go to Blocked Device page and click Revoke Blocklist to move the device to Unauthorized Device list.