Manage My Infra
Last update:2023-10-27 16:06:45
You can configure “My Infra” through the Customer Portal.
In “My Infra” page, you can do the actions including:
- Create a new Server Group.
- Add a server to an existing Server Group. Server IP and host name is necessary.
- Check the server’s status.
- Enable/Disable servers and/or server groups if necessary.
Follow the steps to manage “My Infra”:
1. Log in to your account.
2. Click on “My Infra” which is under “Cloud DNS”.
After that, you will see a list of your current server groups.
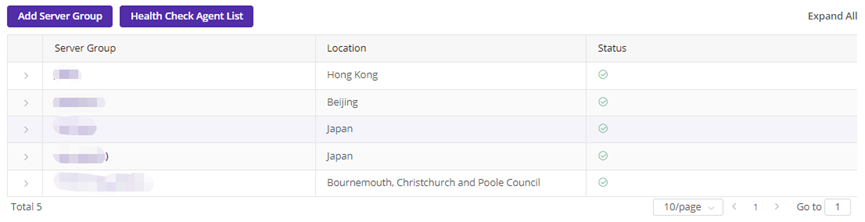
- Server Group (with number):
Server Group: The server group name
(number): The total number of servers that belong to the group. - Location:
The location of the server group. - Status:
Green: Enable
Red: Disable
3. Click on “Add Server Group” button and you will be directed to the following screen
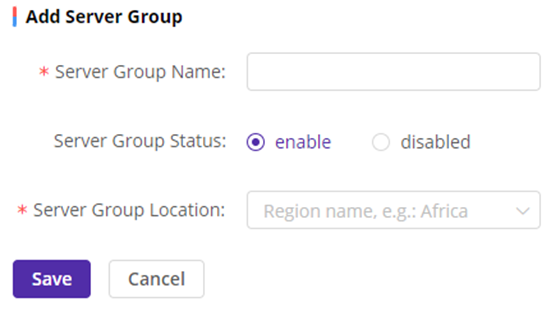
- Enter a new server group name.
- Select the status of server group.
The status is “enabled” by default, and you can modify it.
If you select “disabled”, then the “disabled” status will be applied to all servers that belong to the server group and those servers will not be used as load balancing targets. - Select the location of the server group.
- Click on “Save” button.
4. Add servers to the server group.
a) Click on Server group name, and you will go to the editing page of this server group.
b) Click on “Delete Server Group”, and you will delete this server group.
c) Click on “Add Server” and input the information of server in the pop-up window.
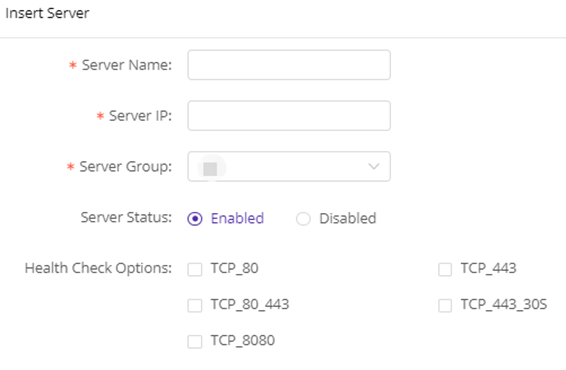
- Enter the name of the server.
The name of the server should be unique. - Enter the IP address.
The IP address should be unique. - Select a Server Group.
- Select Server status.
The status is “Enabled” by default, and you can modify it.
If “Disabled” status is selected, the server will not be used as load balancing target. - Select the Health Check options.
This information is for the applicable servers’ filter when the health check option is turned on.
If you want to define a customized health check method, please contact customer service.
d) Click on the “Save” button
5. Click on “Health Check Agent List” button to get the IP whitelist for CDNetworks’ health check agent and you will be directed to the following screen:
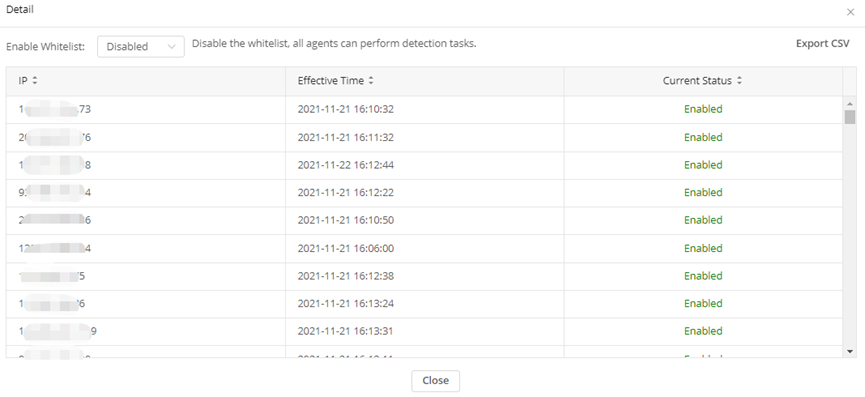
a) Basic information
- IP: The IP address of CDNetworks’ health check agent.
- Effective Time: Time when the IP of the health check agent takes effect.
- Current Status: The health check agent with ‘’Enable’’ status will perform detection tasks while the health check agent with ‘’Disable’’ status will stop the detection tasks.
b) Select the whitelist mode.
- Disable: Disable the whitelist, all agents can perform detection tasks.
- Auto: In this mode, the new health check agent will be automatically added to the whitelist when the effective time is reached. This require you to implement this feature at your system by using below API.
(https://documents.cdnetworks.com/document/api-doc/26378) - Manual: Manually manage the whitelist, and only the agents in the whitelist will perform probing tasks. The agent list needs to be maintained manually.
Is the content of this document helpful to you?
Yes
I have suggestion