Add CLB Domains
Last update:2023-10-27 16:06:39
You can add “CLB” Records when you manage the DNS data.
You can do the following configurations:
- Add a new CLB domain.
- Assign the registered servers to the CLB Domain.
- Create a load balancing policy with/without the health check option.
When you are in “Manage Zones” page, click the “Add” icon next to “CLB” Record, and you will go to the following screen:
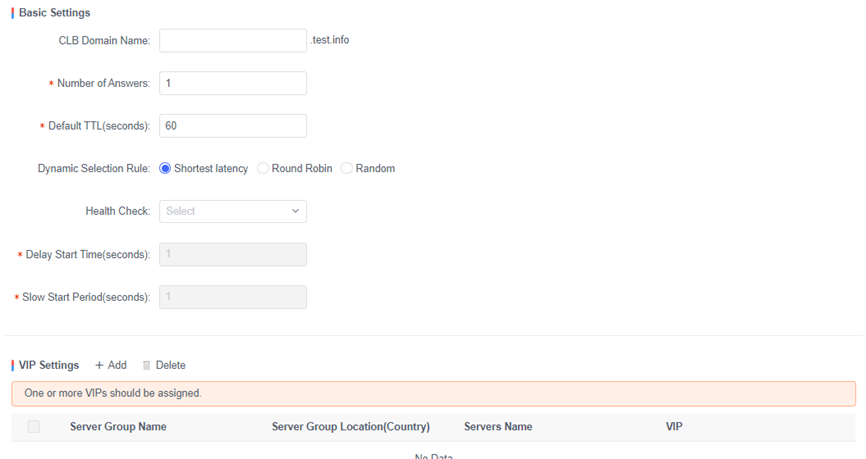
There are 4 sections in the CLB Domain configuration UI.
1. Basic Settings
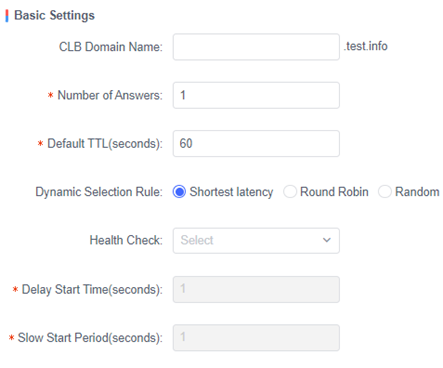
a) Specify a CLB Domain Name
b) The default value of “Number of Answers” is 1 and you can change it.
c) The default “TTL” value is 60 and you can change it.
d) Dynamic Selection Rule: Default value is “Shortest latency”. Click on option button to change the Dynamic Selection rule.
If you assign multiple servers to a specific policy, you can choose the rule for selecting proper server(s) from the assigned servers to the policy.
- Shortest Latency: Select the servers of the best performance.
- Round Robin: Round Robin rule.
- Random: Select the server randomly.
e) Health Check: Select Health check for the failover action.
Unless you select the health check rule, you cannot use the failover action.
Failover Action: you can configure failover action in case all servers assigned to the given condition are down.
f) Delay Start time
When VIP has been recovered from “down” to “up” (good status), this value determines the amount of time to be delayed on the start time. This value is in seconds and the default is set to 1, and value range is 1-172800. This field is enabled when “Health Check” is selected.
g) Slow Start period
When VIP has been recovered from “down” to “up” (good status), this value determines the duration within which the service is applied gradually to the server. This value is in seconds and the default is set to 1. This field is enabled when “Health Check” is selected.
2. Server IP Settings
a) Click on “Add” icon to add server IPs

If you click “Add” icon, you will see the following screen.
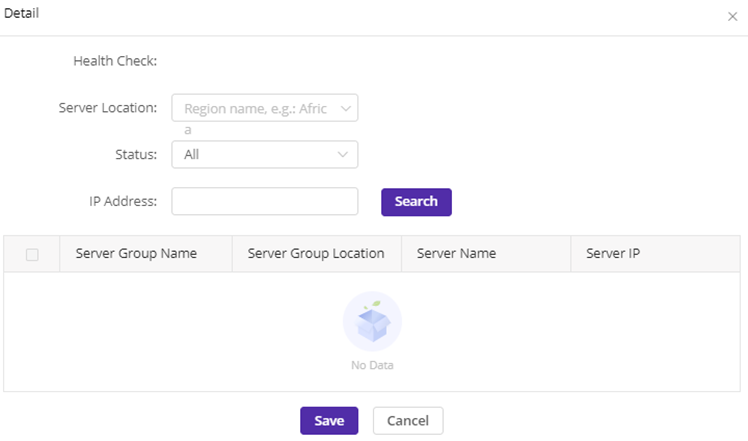
Enter the keyword and click on the “Search” button, and you will see a list of VIPs
Select the servers and click on the “Save” button, and the selected VIPs will be added to VIP list of the CLB domain.
b) Select the VIPs and click on “Delete” button, you will delete the selected VIPs.
3. Policies
Click on “Add Policy” button, and you will see the following screen to add a policy.
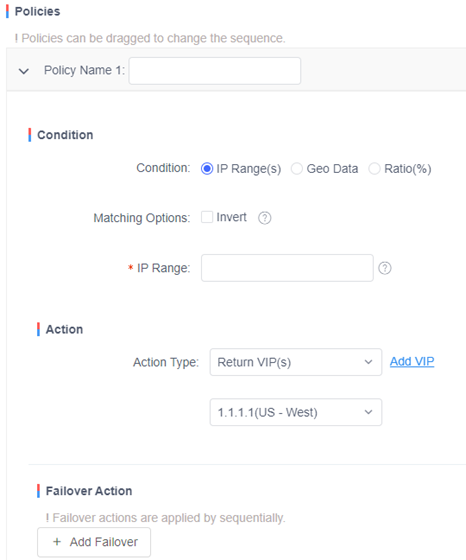
You can create a load balancing policy at this section.
a) Specify a Policy Name.
b) Choose the Policy Status.
The default “Status” is set to “Enabled”, and you can change the value.
If the status is “Disabled”, the policy will not be used as load balancing policy.
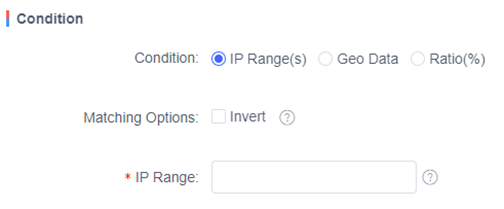
c) Choose one Load Balancing Condition from 3 options.
-
IP Range(s): Load Balancing based on the IP range.

- Enter the IP Range(s):
It can support multiple IPs and IP ranges, which can be separated by commas. IP Range takes input in CIDR form. In general, the LDNS IP used by clients is used for this condition. - Check the box of “Invert”:
If this box is checked, you can apply the invert condition in policy matching. For example, if “IP1” is given as the IP range, the policy with this option matches the DNS queries from all of the IPs except “IP1”.
- Enter the IP Range(s):
-
Geo Data: Geo-Data-Based Load Balancing.
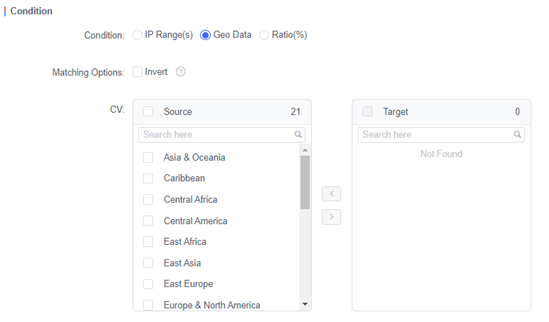
- Specify the Custom Region/Region/ISP
- Enter the ASNs
- Check/uncheck the box of “Invert”
If the LDNS does not support EDNS feature, the LDNS IP of client is used for this condition. If the LDNS supports EDNS feature, the subnet of client is used by default.
-
Ratio (%): Load Balancing is based on the ratio of the requests.

Enter the Percentage from 1 to 100.
d) Actions
Choose Action(s) according to the given condition. 4 actions can be chosen.
-
Return VIP(s)
Return the IP that is assigned to this CLB domain from the VIPs.

You can apply one action to multiple servers
Click on “Add VIP” icon, you can add another server IP.
NOTE: Server Health Check Functionality is available only for this action. -
Return A record(s) without health check

- Enter an A record and specify its TTL (the default is set to 60, and you can modify it).
- Click on “Add Record” icon to add multiple A records.
-
Return CNAME record

Enter a CNAME record and specify its TTL (the default value is 60, and you can modify it). -
Deny (no response) Type

No response for the query when it is matched to the given condition.
e) Failover Action
Click on the “Add Failover” button, you can add the Failover Actions.

- The action type is same as the type described in “Actions” section.
- Multiple Failover actions will be applied sequentially.
- The Failover action will be used in case all the servers assigned to the given condition are down.
- If the health check option is turned off, the failover action will not work.
4. ETC
You can choose the policy types from 3 options in case you do not create any load balancing policy or a query is not matched to the existing policies.
- Dynamic Selection From all IPs
Return the assigned servers based on dynamic selection rule.

- Fixed Record
Return a fixed record type. You can choose A record or CNAME record.

Select the Record Type (A or CNAME).
Enter a record (A record or CNAME record) and TTL. - Deny
No response to the queries.

NOTE:
- After you complete the CLB configuration, click “Save” button and you can go to the Manage Zone page.
- Click on “Push to Staging Zone”, and you will push the CLB configuration to staging zone; click on “Push to Production Zone”, you can push the CLB configuration to production server.
- If you add multiple policies, they will be applied sequentially.