Cloud Director
Last update:2023-05-24 17:58:01
Feature Intro
Cloud Director has very extensive application scenarios. It can be applied in any scenario that needs to switch screens, including but not limited to the following scenarios:
- Live Event, with multi-camera images, and switch different live images through the cloud director console;
- Live Game, through the cloud Director console, multiple game viewing angles can be switched;
- Live TV, different input source screens can be switched through the cloud director console, and the virtual studio function can be realized through image matting.
Instruction
Create and Manage Cloud Director Console
1. Log in Cloud Live, access to Cloud Live-> Cloud Director. You can view all director instances, create new director console, edit and close director console on this page.
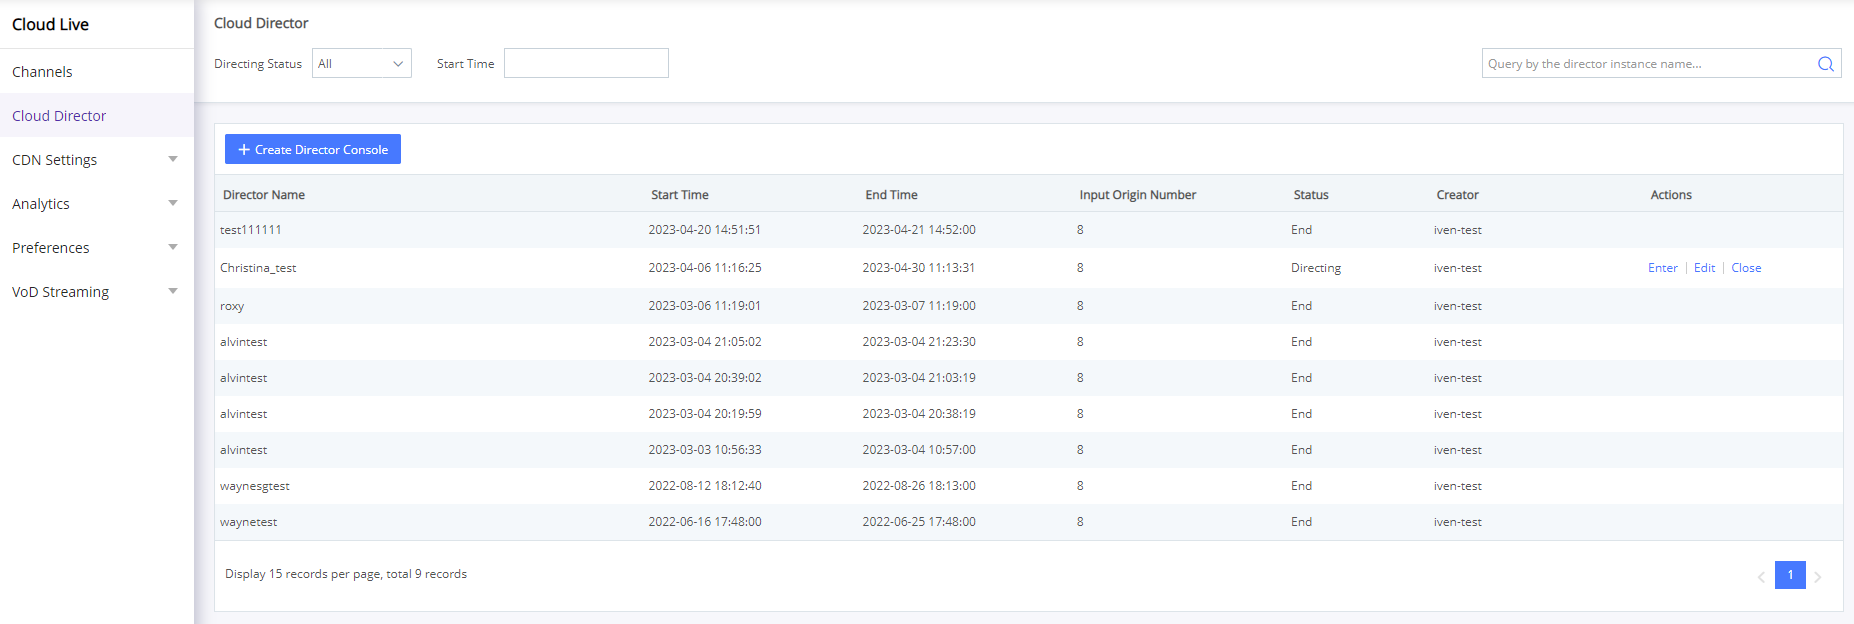
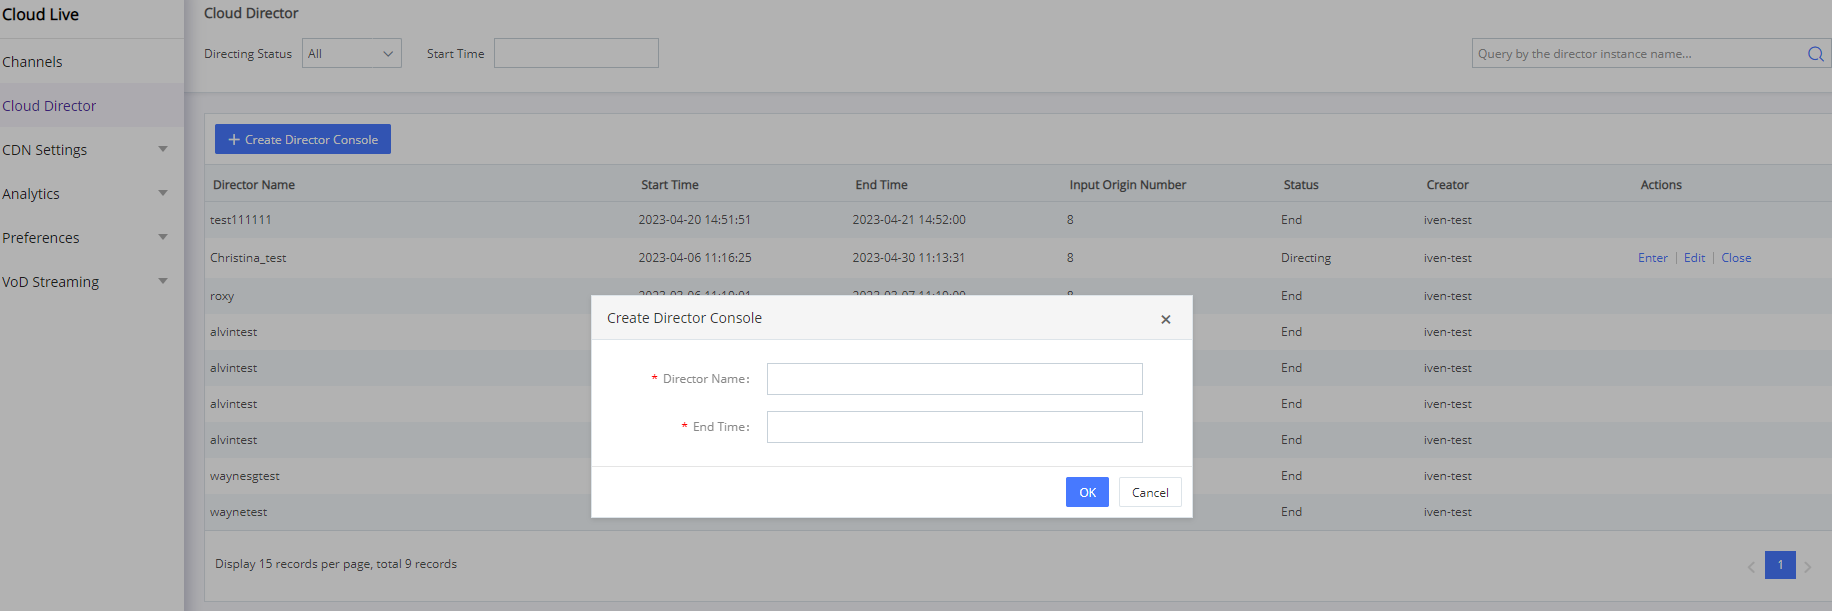
2. On the instance management page, you can create a new director console by clicking “Create Director Console”, enter director name and end time.
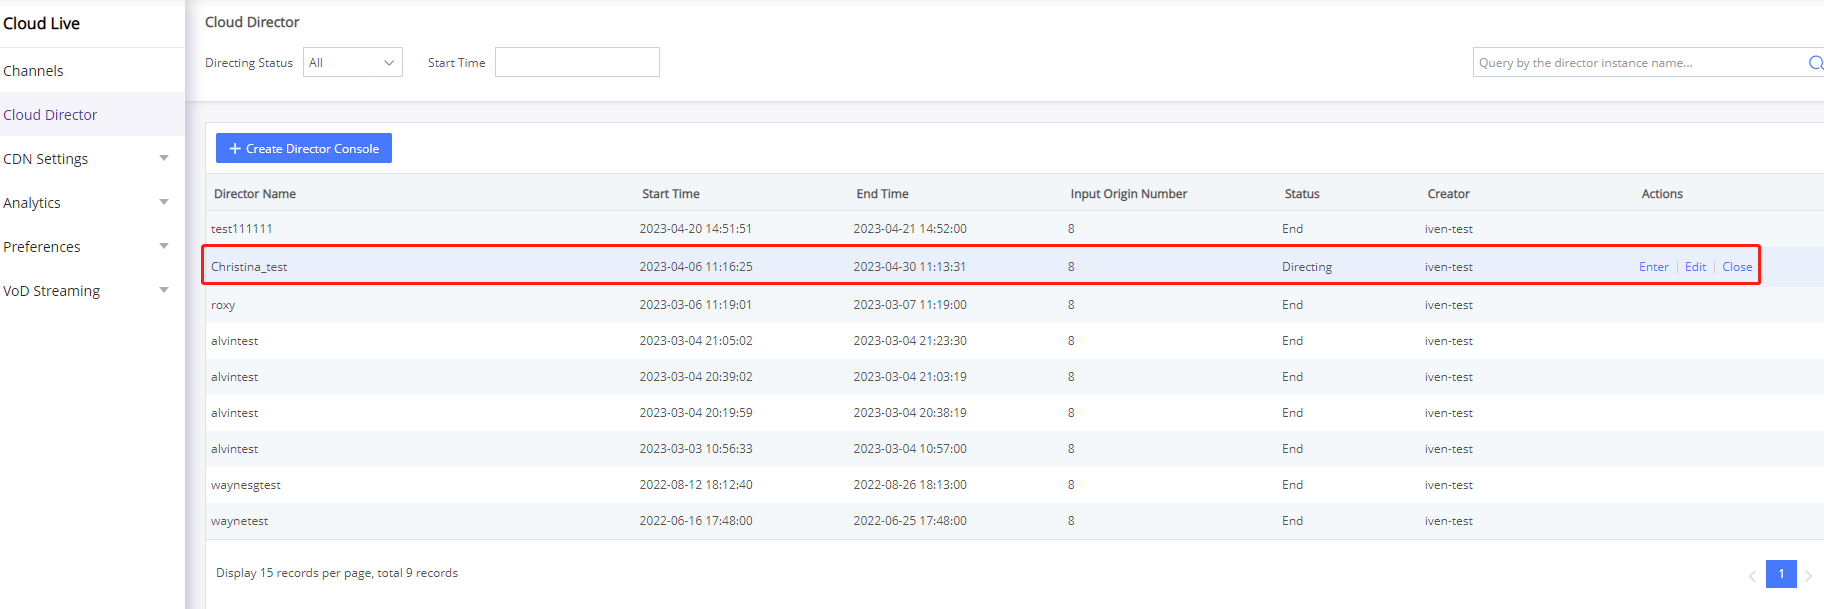
3. After director console is created, you can view and manage all your director instances on the director instances management page. This page will show the director name, start time, end time, input origin number, status, creator and operation buttons.
For the directing instance, you can enter, edit and close directing.
For the ended instance, you can delete the instance.
- Enter: enter director console page
- Edit: edit director name, delay the director end time
- Close: close the director console immediately.
Director Console Management
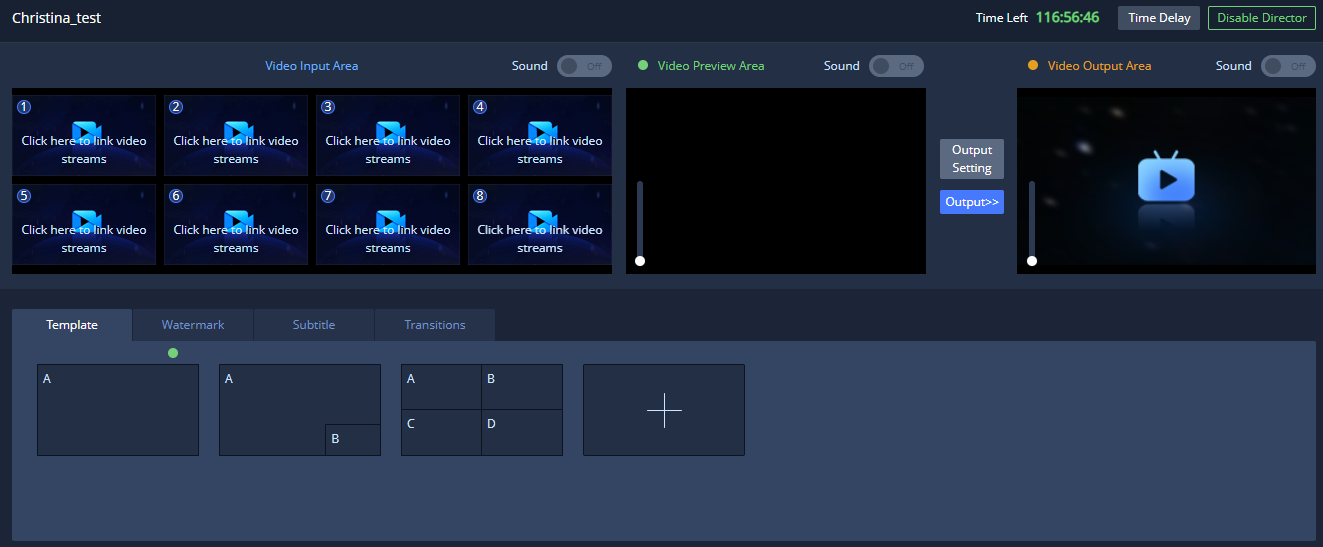
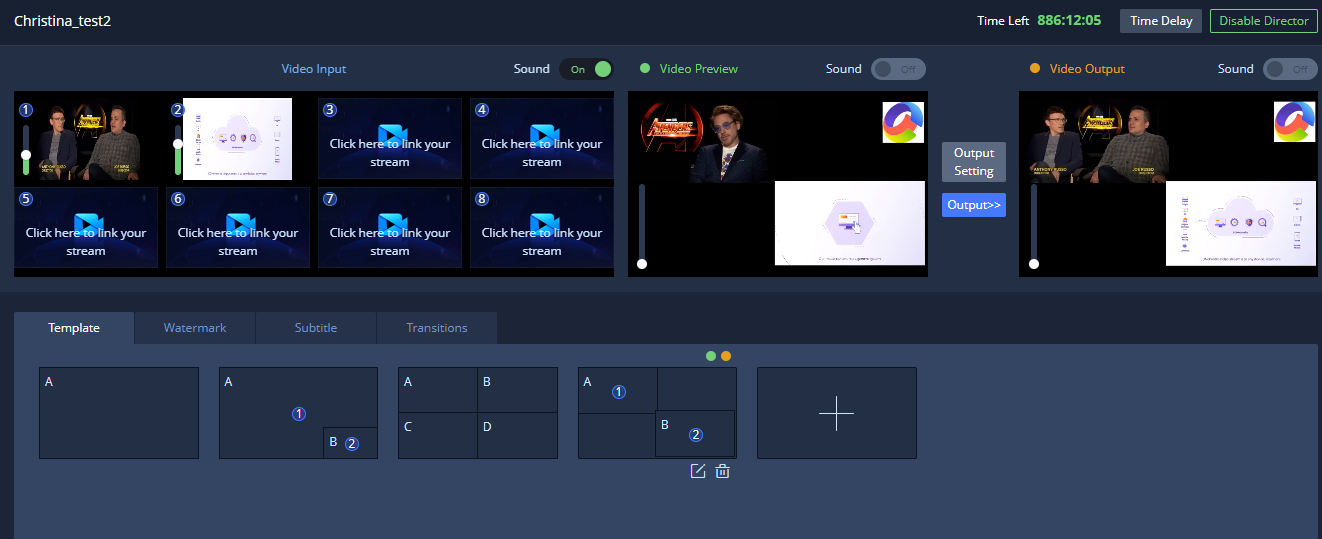
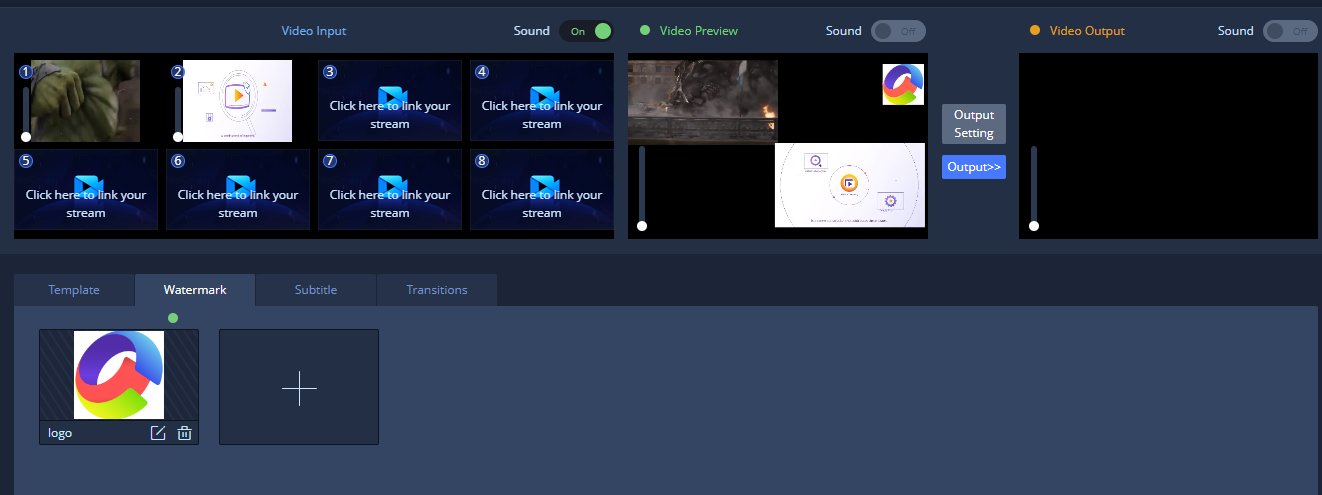
All users who have subscribed to the cloud director can enter the director console after creating an instance, and use the web version of the cloud director platform. The cloud director console is divided into video input area, video preview area, video output area and template, watermark, subtitle, and transition management area.
- Video input area: to set input origin, manage it and preview the image of the input origin.
- Video preview area: to preview the image of the combined stream.
- Video output area: display the image of the actual output stream.
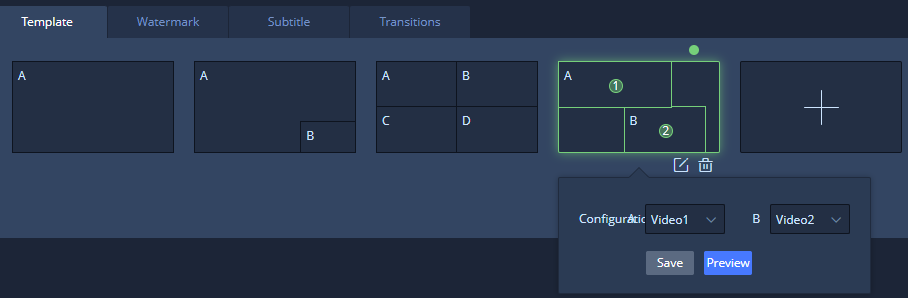
- Template, watermark, subtitle, and transition: to manage the template, watermark, subtitle, and transition content. There are three templates for single-screen, picture-in-picture and conference mode by default.
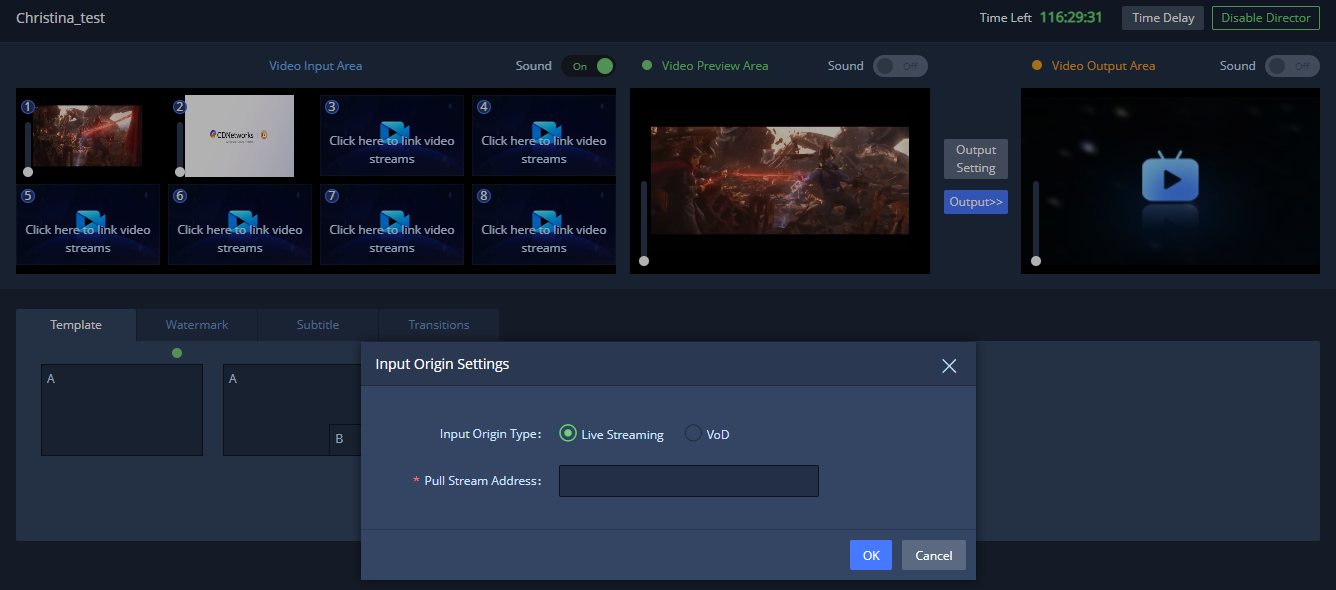
1. Input Origin Setting
To set the input origin for the first time, you can directly click on the input origin screen, add an associated video stream, and the input origin setting interface will pop up, where you can input live streaming or VoD content respectively, and fill in the corresponding pull stream address. After clicking OK, the input origin will display the video content of this stream address.
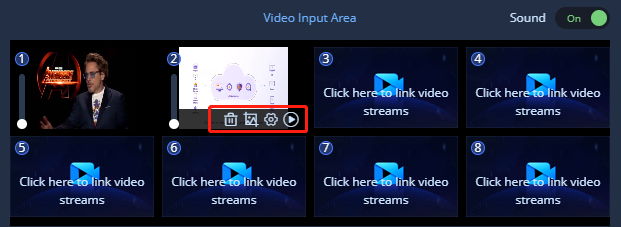
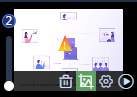
After setting the corresponding input origin; you can move the cursor to the video screen and click the corresponding operation button, deleting the current input origin is supported; online video matting; edit the input origin; refresh and play the input origin video.
2. Output Setting
Click output setting on directing console to set output related configurations.

- CBR: You can choose to enable/disable the fixed bitrate setting, and the default is enabled
- Video Quality: the default configuration is 2K, FHD, HD and SD, and you can choose custom settings also.
- Resolution: The resolution of output video
- Bitrate: The bitrate of output video
- Latency: set the latency time of output video, The actual time the video plays will be added to the latency time you set
- Push stream address: Set the output video address, The address needs to fill in the push stream address of the output channel. At least one stream address can be filled in, and a maximum of 5 addresses can be filled in.
3. Template Setting
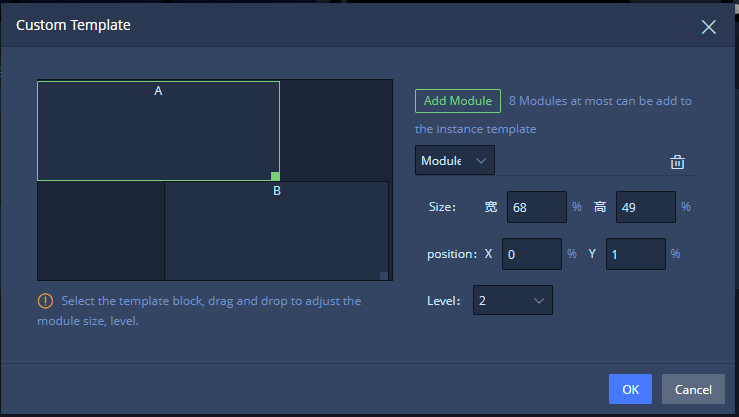
Different output templates can be configured. By default, There are three templates for single-screen, picture-in-picture and conference mode. New custom template can be added, and a maximum of 14 templates can be supported.
If you need to customize the new template, you can click the Add button to add and configure a custom template. In the custom template, the input origin screen can be added by adding modules, up to 8 modules can be added, and the size and level of the modules can be adjusted by dragging in the left area. In the right area, you can fine-tune the module size, position and level by customizing the values. Among them, the levels are arranged according to the size of the number, 8 is the highest level, and 1 is the lowest level.
If you need to reduce the number of modules, you can delete the current module through the delete button.
4. Director Switching
After configuring the template, the background staff can select the corresponding template to switch the output screen in real time, which is used to quickly switch the screen of the director console during director switching.
After configuring the template, you first need to select the corresponding input origin for each module. The display screen of each module will display the selected input origin screen. Click Save to temporarily store the video input information. Click Preview to save and switch the current video preview area screen to the new template-configured input combination screen.
In the video preview area, you can check the content of the video screen to be output in advance, and confirm that the output screen meets your expectation. Click Output to confirm the output of the screen in the preview area.
5. Sound Control
In the screen of push stream synthesis, the sound needs to be controlled, and the background management staff need to monitor the current video screen in real time, and can select the currently monitored audio through the sound button in the upper right corner of the video input area, video preview area, and video output area.
If you need to control the sound of the input origin, you can drag and control the sound control bar on the left side of each input origin screen in the video input area. The default sound size is 50. You can decide the final sound combination effect by controlling the volume of each input origin. After the adjustment is completed, you must click the save or preview button in the template to take effect.

In the video preview area and video output area, you can also drag the sound control bar on the left to adjust the volume of the output sound.
6. Video Matting
Video matting allows background operators to cut out the video to achieve a movie green screen effect. Move the mouse to the video area, click the image button to enter the matting setting interface.
In the matting interface, you can set the matting parameters accordingly, and the detailed functions of the corresponding parameters are as follows:
- Image Matting Setting: select to enable/disable matting
- Background Color: To select the standard background color during the matting process, click the color box on the right to pop up the color selection interface to select the matting background color, and the color in the video that is the same as the selected color will be cut out.
- Similarity: Drag the similarity setting bar to adjust the similarity percentage. The larger the similarity value, the closer the matting color is to the defined background color. A similarity of 100% means that the background color needs to be completely matched, and a similarity of 1% means that any color is matched
- Degree Of Integration: Drag the degree of integration setting bar to adjust the integration percentage. The meaning of this integration value is the transparency of the remaining video content of the matting when it is superimposed on the main screen. 100% is fully transparent, which means no other video sources are superimposed, and 0% is completely opaque.
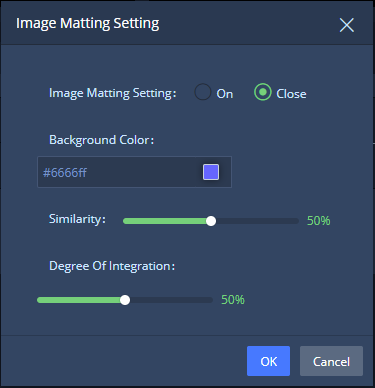
After clicking OK, the matting settings will take effect. If you need to combine screens with other video screen, you need to add multiple video origin in the custom template, including the matting screen, and set the matting video origin level upper than other video screens. Thus, the replacement of the green screen in the video background can be realized.
7. Video Watermark
Video watermark allows users to add watermarks in the playback screen, such as platform LOGO, station logo, etc. In the watermark management, you can customize and add video watermarks, and you can save up to 7 watermarks.
In the interface of adding watermark, the watermark file can be uploaded locally. Please note that the resolution of the uploaded watermark cannot exceed 250*132, and the size cannot exceed 1M. The uploaded watermark file can adjust the watermark settings through the following parameters:
- Watermark Name
- Position
- Size
- Transparency:0% is fully opaque, 100% is fully transparent.
- Adaptive: Set whether the watermark scales proportionally with the resolution of the output video. If you select Yes, the size of the watermark will be consistent with the output video resolution.
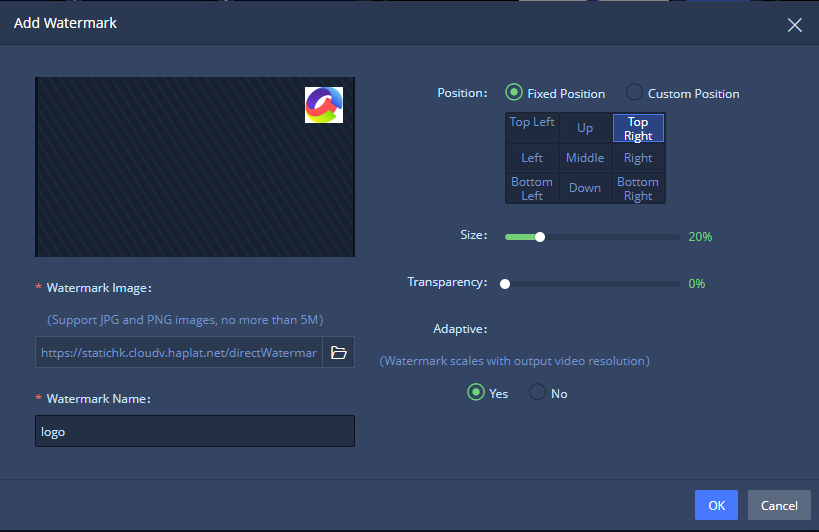
After setting the watermark, you can click the watermark button to be displayed to determine the watermark to be added, and the effective watermark will be displayed with a green dot in the upper right corner. If you need to cancel adding the watermark, you can cancel by clicking the corresponding watermark again.
8. Time Delay/Disable
During the use of the cloud director, the video stream will continue to be output in the background. In order to avoid the automatic shutdown of the director console, the delay setting can be used to extend the effective time of the director instance. The delay time can be entered at a minimum of 30 minutes and at a maximum of 180 minutes.
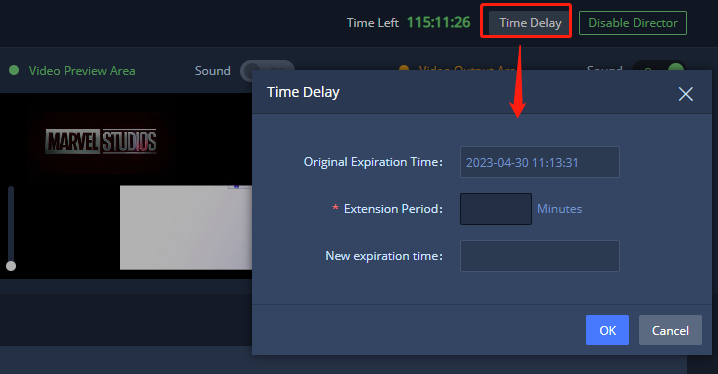
After using Cloud director, please click the “Disable Director” button in a timely manner to disable the director instance and avoid additional costs. Otherwise, the backend will continue to merge the director’s streams.
