Get Started
Last update:2026-04-15 18:50:18
This guide walks you through setting up low-latency live streaming with WebRTC playback. It covers two workflows:
- RTMP Ingest → WebRTC Playback: Use your existing RTMP encoder to publish, and deliver to viewers over WebRTC. Easier to set up, with a small latency addition from audio transcoding.
- End-to-End WebRTC: Use WebRTC for both publishing and playback. Delivers the lowest possible latency.
Which workflow should you choose?
| RTMP → WebRTC | End-to-End WebRTC | |
|---|---|---|
| Latency | Low (minor overhead from AAC-to-Opus transcoding) | Lowest |
| Encoder compatibility | Any RTMP encoder (OBS, FFmpeg, hardware encoders) | WHIP-compatible encoders, or OBS with a custom plugin |
| Setup complexity | Simpler — uses standard RTMP publishing | Requires WHIP configuration or plugin installation |
| Audio transcoding required | Yes — AAC to Opus (must be enabled by support) | No — Opus is used natively |
Encoding Requirements
WebRTC playback requires your source stream to meet specific codec constraints. Configuring your encoder correctly from the start avoids playback failures and unnecessary transcoding.
-
Video Codec: H.264 without B-frames
WebRTC decodes frames in arrival order. B-frames (bi-directional predicted frames) require out-of-order decoding, which conflicts with WebRTC’s real-time jitter buffer and can cause playback errors or visual artifacts. -
Audio Codec: Opus
The WebRTC specification requires Opus for audio. Modern browsers do not support other audio codecs in WebRTC sessions.
Pro Tip: If your source stream does not meet these requirements — for example, it includes B-frames or uses a non-Opus audio codec — the platform can transcode the stream to make it compatible. However, transcoding adds latency and may incur additional costs. This feature is not enabled by default. Contact our support team to enable it.
Workflow 1: RTMP Ingest, WebRTC Playback
This workflow lets you publish with a standard RTMP encoder and deliver to viewers over WebRTC. It is the fastest path to WebRTC playback if you already have an RTMP-based publishing setup.
Warning: RTMP does not support the Opus audio codec. When using this workflow, your encoder must output AAC audio, and the platform will transcode it to Opus for WebRTC delivery. You must contact our support team to enable AAC-to-Opus transcoding before you begin. Without it, WebRTC playback will not have audio.
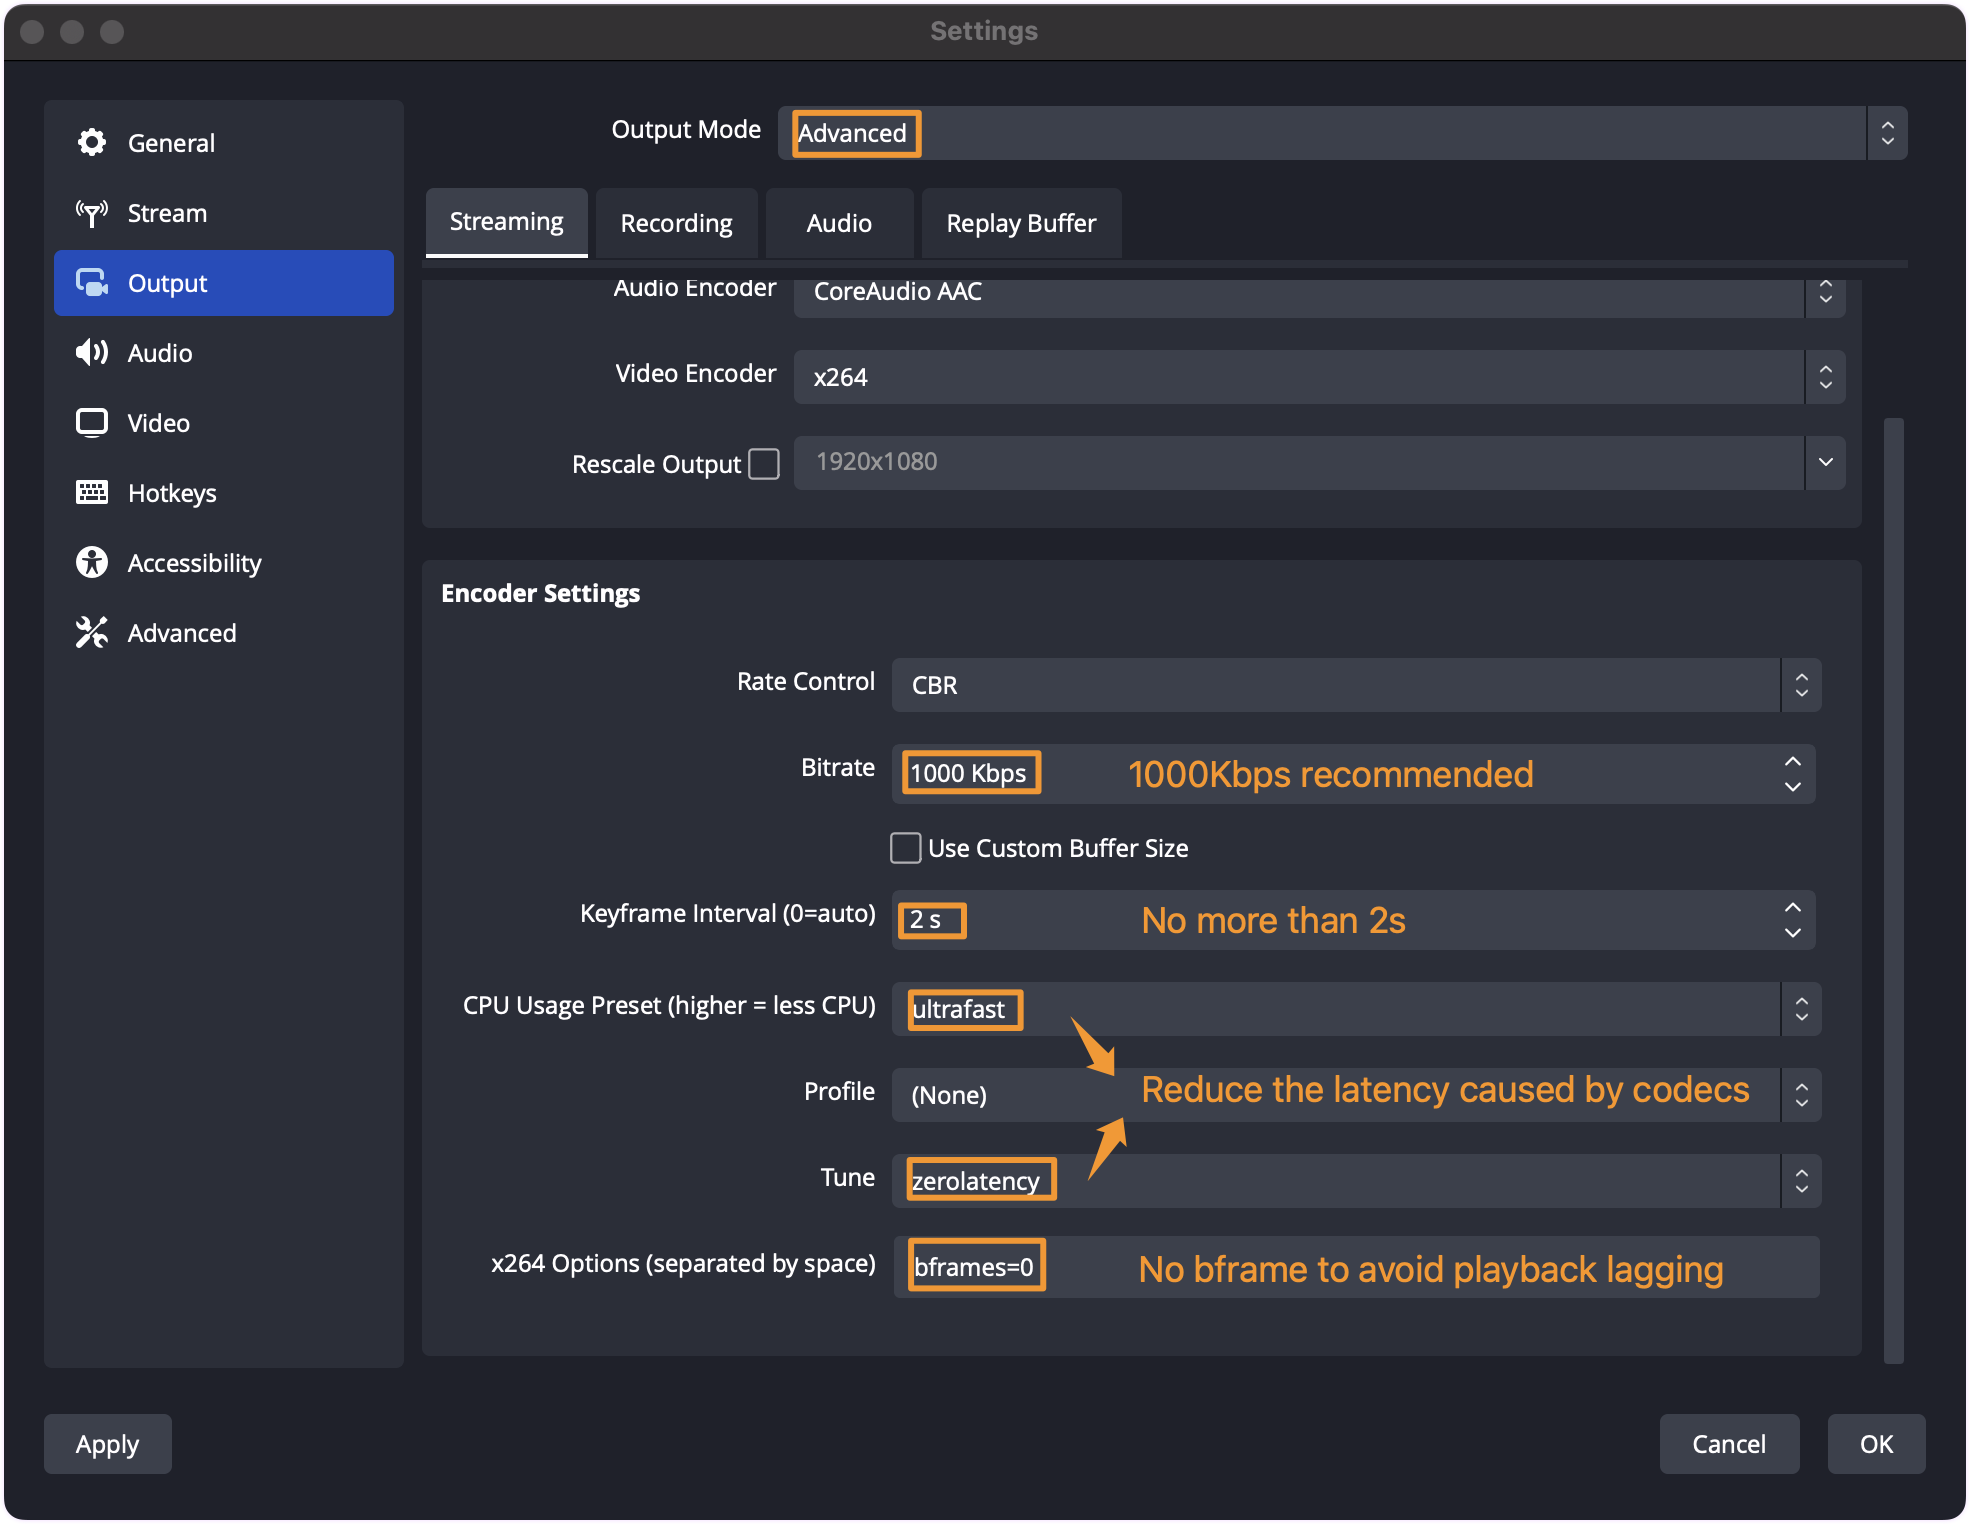
Step 1: Configure Your RTMP Encoder
You must configure your encoder to produce a WebRTC-compatible video stream. The most critical setting is disabling B-frames.
The following steps use OBS Studio as an example:
- Open Settings and navigate to the Output tab.
- Set Output Mode to Advanced.
- In the Streaming tab, locate the x264 Options field.
- Enter
bframes=0to explicitly disable B-frames.
For additional recommended encoder settings, refer to the image below.
Step 2: Set Your Stream Destination
- In OBS, navigate to the Stream tab in Settings.
- Select Custom… from the Service dropdown.
- In the Server field, enter your RTMP push URL:
rtmp://your-push-domain.com/appname/streamname
- your-push-domain.com — Your assigned push domain.
- appname — The application name used to group your streams (e.g.,
live). - streamname — A unique identifier for this stream.
- Click Apply, then click Start Streaming in the main OBS window.
Warning: The appname value in your push URL must match an application name that has been configured in the Low Latency Streaming product console. If the application name does not exist in the console, stream ingest will be rejected.
Workflow 2: End-to-End WebRTC
For the lowest possible latency, use WebRTC for both publishing and playback. This eliminates the need for audio transcoding and reduces the end-to-end delivery path. We now support WHIP (WebRTC-HTTP Ingestion Protocol) — the modern industry standard as the ingest protocol. See the WHIP/WHEP Setup Guide for full configuration details.
Playback and Testing
Once your stream is live, use the following resources to verify playback. Test your stream instantly in any modern browser using the web demo player:
CDNetworks WebRTC Player — Enter your playback URL to preview the live stream with WebRTC delivery.