Mitigate Resource Exhaustion Tutorial
Last update:2025-01-16 14:15:51
Scenario 1: Limit high-frequency access to key API interfaces
Example: The ticketing website www.ticket.com is selling concert tickets today via the interface /api/BuyTicket on Monday 10:00 - 11:00 (GMT+8). To prevent improper ticket hoarding, it is necessary to limit the frequency of accessing this interface to not exceed 100 times in 10 seconds. If this threshold is exceeded, requests access to this interface from that client IP should be blocked for 10 minutes. The configuration steps are as follows:
1. Create rate-liming rule
- Navigate to the Security > Shared Configurations > Rate Limiting.
- Click Create.
2. Configure rule information
-
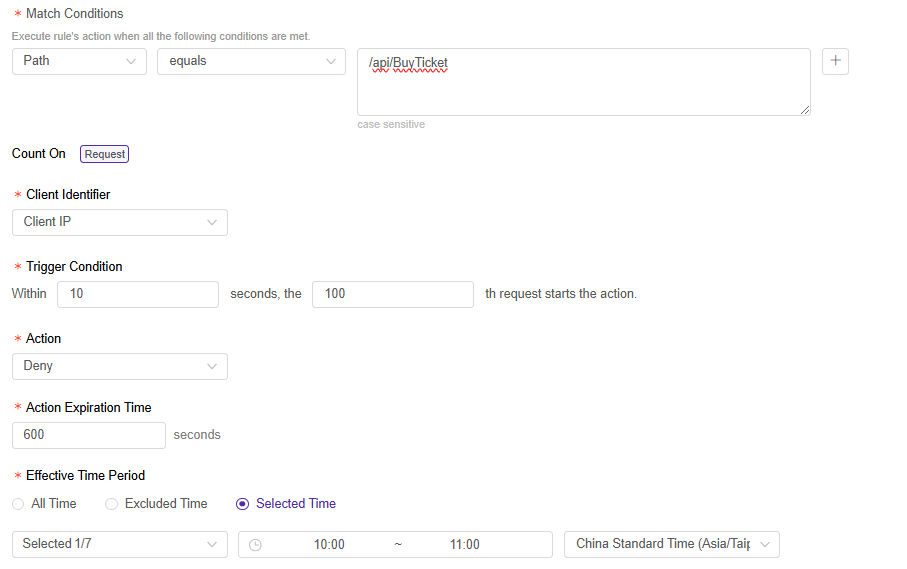
Configure Match Conditions: select Object as “Path”, Operatoer as “equals”, and type the content “/api/BuyTicket”
-
Configure Counts: select Client Identifier as “Client IP”, Thigger Condition as “Within 10 seconds, the 100th request starts the action.”, Action as “Deny”, and set the Action Expiration Time “600 seconds”, finally set the Effective Time Period as “Monday, 10:00 - 11:00, GMT+8”.
-
Click Confirm to create this rule.
The configuration is shown below:

3. Associate hostnames
- Go back to Rate Limiting page, and find the created rule.
- Click
 to associate the hostname, select “www.ticket.com” from the hostname list, then click Confirm to issue this rule.
Scenario 2: Mitigate website access pressure from crawler tools
1. Create Strategy
- Navigate to the Security > Policies
- Find the hostname you want to protect, click
 .
. - Go to Bot Management tab.
2. Configure Strategy information
- Configure Basic Detection :
- Allow passage for the site-specific monitoring tools (if it exists). Based on the characteristics of monitoring tools, create rules in Custom Bots and set the action to Skip. Learn more.
- Allow search engine crawlers to ensure the SEO effectiveness of the website. In Known Bots, set the action for the search engine category to allow; if there’s no such need, you can also set the action to Deny.
- Block common commercial or open-source tools. In User-Agent Based Detection, set the action for categories such as Low Version User-Agent, Fake User-Agent, Automated Tools, and Crawler Tools to Deny.
- Configure Client-based Detection:
- Check whether the website has any business beyond web/H5 pages. If so, configure the relevant business characteristics into Bypass Traffic from Specific Clients to avoid affecting the normal access of such business when the Web Bot Detection strategy is enabled. Learn more.
- Enable the JavaScript-based web enhancement protection solution. Set the action for Web Bot Detection to Deny. Learn more.
Before publishing to production, it is recommended to pre-publish a test through the “Publish Changes - Publish to Staging” button at the bottom of the page to validate the compatibility of the Web Bot Detection’s JS SDK with your website.
3. Enable Strategy
After confirming the configuration is correct, click the Publish Changes button at the bottom of the page, and click on Publish to Production button at the bottom of the page to make the configuration effective.
Scenario 3: Blocking Behaviors that Do Not Comply with Normal Business Access Logic
For Behaviors that do not comply with the normal business access logic, such as automated tools bypassing page visits and directly launching continuous attacks on a certain interface. it is recommended to configure Workflow Detection strategy on top of Scenario 2 to strengthen the protection. For configuration examples, please refer to Workflow Detection Details.