Policies
最終更新日:2025-12-19 13:32:21
The Policies page is used to centrally manage all security policies.
Go to Policies:
- Log in to the CDNetworks Console, find the security product in use under Subscribed Products.
- Go to Security part, Configurations > Policies.
1. Add hostnames that need to be protected
Click + Protected Hostnames, follow the prompts to add hostnames. For details, please refer to: Add Your First Domain.
2. View Policy Status
- View Policy Status:
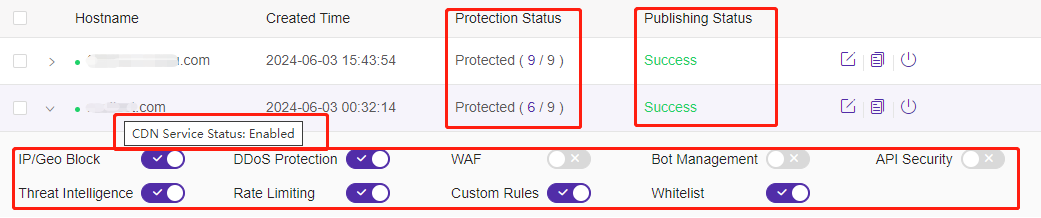
- Protected:If your Flood Shield 2.0 service is still valid and security policies are enabled, the Protection Status of your hostname will be displayed as “protected”.
- Not Protected:If your Flood Shield 2.0 service has expired or no security policies have been enabled, the Protection Status of your hostname will change to “Not Protected”.
- Publishing Status: When modifying the hostname’s configuration, the Publishing Status of the configuration will first be displayed as “Publishing”, and after the configuration takes effect, it will be updated to “Success”.
- Move the mouse over the Hostname, you can see the CDN Service Status of this domain.
3. Enable or Disable Policies
You can enable or disable specific security policies according to requirements. Disabled security policies will not take effect, but their configurations will be saved. When you enable the security policy again, the previous configuration will continue to be used. There are two scenarios to enable/disable security policies:
3.1 Enable or Disable the policies for a hostname
- On the Policies page, find and expand the hostname for which you want to enable or disable the security policy.
- Click the switch button to enable or disable the security policy, after a second confirmation, the configuration will take effect immediately.
- You can also disable all policies for a hostname with click
 . After a second confirmation, all security policies for that hostname will be disabled.
3.2 Enable or Disable policies for multiple hostnames at the same time
- On the Policies page, check the hostnames for which you wish to enable or disable the security policy.
- Click the Enable or Disable Policies, in the pop-up dialog box, select the policy type you want to change and set its policy status. If there’s no need to change a policy type, please do not check it.
- Click Confirm to change the specific policy type for the selected hostnames.
4. Copy policies to other hostnames
After enabling Flood Shield 2.0, if you have multiple hostnames that need to use the same configuration, you can use the “Copy policies to other hostnames” feature to copy the security policy configuration of a hostname and apply it to other hostnames. The operation is as follows:
- On the Policies page, locate the hostname whose configuration you want to copy to other hostnames, and click
 .
. - In the pop-up dialog box, select the policy type you want to copy and choose the target hostname that will receive this security policy configuration.
- Click Confirm, the selected configuration will replace the existing configuration of the corresponding policy type in the target hostname.
Tips: Before performing the copy operation, make sure you have enabled the corresponding security policy for the target hostname.
5. Reactivate the hostname whose service has expired
Due to reasons such as service expiration, the connected hostname may stop the security protection service and enter the “Not Protected” state. After the service expires, the configuration of this hostname will be deleted after a period of time and removed from the Flood Shield 2.0. If you have renewed before the hostname is removed, you need to reassess whether you need to re-enable security protection for these hostnames. If you need to reactivate security protection, please follow the steps below:
- On the Policies page, find the hostname you want to re-enable security protection for, and click
 .
. - In the pop-up dialog box, select the security policy you want to enable.
- Click Confirm, the selected hostname will reactivate security protection and enable your chosen security policy.
Tips: After reactivating the security protection, the configuration will remain consistent with the configuration when it was stopped. However, the managed rules of WAF (when you set the WAF protection mode to automatic mode) and DDoS Managed Rules will update the rule set.
6. Remove hostname from protected hostnams
When a hostname does not need security protection, it can be removed from the Flood Shield 2.0. After removal, the security protection configuration of this hostname will be deleted. If you need to use the security protection function again, please add it again.
- On the Policies page, find the hostname that needs to be removed from protected hostnames and click
 .
.