Rate Limiting
최신 업데이트:2024-10-28 17:27:35
Rate Limiting can identify clients with excessively high request rates and carry out specific processing actions. Usually, it can be used in the following scenarios:
- Limiting the client’s large number of accesses to specific website resources.
- Mitigating DDoS attacks or Bot traffic.
To configure Rate Limiting:
- Log in to the CDNetworks Console, find the security product in use under Subscribed Products.
- Go to Security Settings > Policies.
- Find the hostname for which you want to configure security policies, click
 .
. - Go to Rate Limiting tab. If this policy is off, turn it on.
Create a Rate Limiting rule
- On the Rate Limiting tab. Click Create.
- In Rule Name, enter a name for the Rate Limiting rule.
- If you want, enter a Description.
- Select a matching object. If you want to configure custom rules for a defined API, please select API, otherwise, please select website.
- At least one matching condition must be configured. If multiple values can be entered for the same matching condition, the relationship between these values is “or”. Please separate different values by line breaks. The supported matching conditions can be found in the Match Conditions.
- If you want, add another rule condition. When you set multiple conditions, they’re strung together with an AND operator.
- In Client Identifier, select the type of requests you want to tally:
- Client IP:Count based on the client IP.
- Client IP and User-Agent: Count based on the client IP and User-Agent in the request header.
- Cookie:Count based on the Cookie carried in the request. Enter the Cookie Parameter Name.
- Client IP and Cookie:Count based on the client IP and Cookie. Enter the Cookie Parameter Name.
- Request Header: Count based on the specified request header, you need to enter the complete header name (case insensitive).
- Client IP and Request Header: Count based on the client IP and specified request header, you need to enter the complete header name (case insensitive).
- In Trigger Condition, enter the counting period (in seconds) and the threshold, if exceeded, triggers the desired action (like Alert or Deny).
- Select the action.
- In Action Expiration Time, enter the duration of the action taken after triggering the request rate threshold.
- In Effective Time Period, select the time period you want the rule takes effect.
- All time: Permanently effective, unless the rule is deleted.
- Excluded time:Not effective during the selected time period.
- Selected time: Only effective during the selected time period.
- Click Confirm.
- Click Publish Changes to make the configuration take effect.
Example
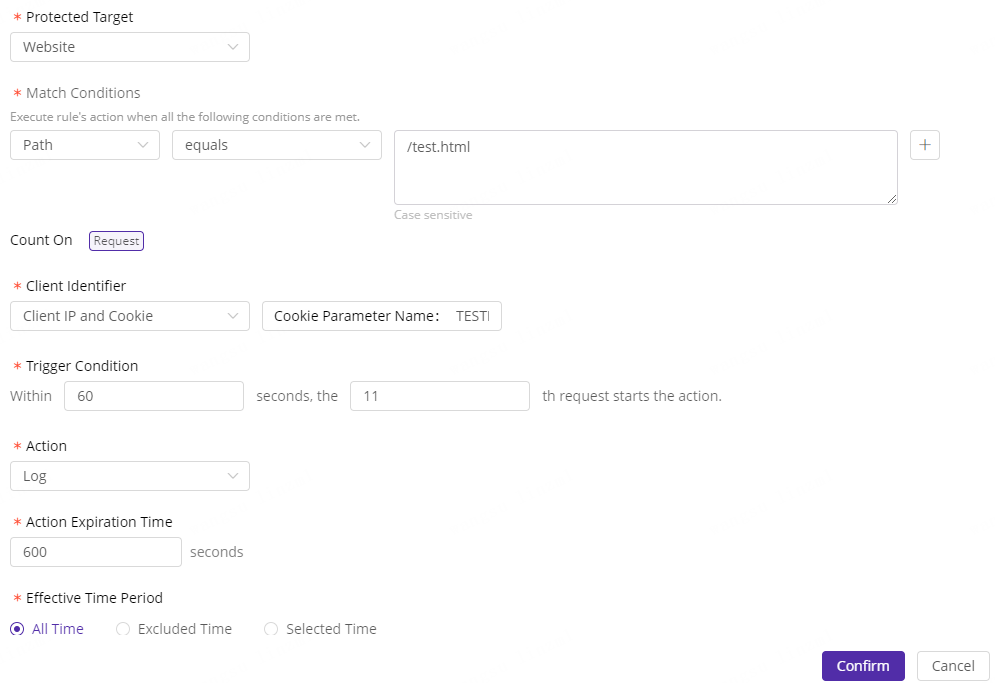
Use IP+Cookie as the client identifier (the same IP and Cookie count as one client), count if the request number to http://www.test.com/test.html exceeds 10 in a single 60 seconds, then block this client for 600 seconds.

이 문서의 내용이 도움이 되었습니까?
예
아니오